Any Existing Builder Can Convert into an SIP Builder
Turn Traditional Expertise into Modern Efficiency
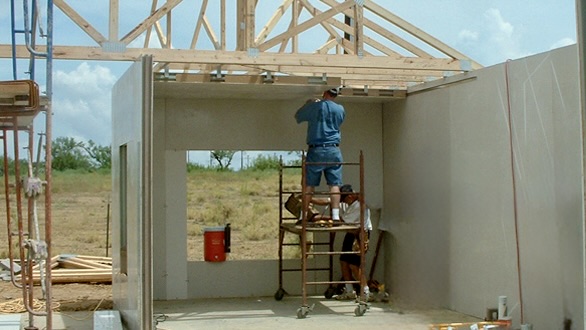
Most builders have the skills to become SIP (Structured Insulated Panel) builders with minimal training. In fact, many builders we’ve worked with became proficient in assembling SIP structures within just a couple of hours. Once you’ve participated in the erection of a SIP structure, you’re essentially ready to handle future projects. Comprehensive and straightforward manuals address any challenges that may arise, making the learning curve even smoother.
Structural Benefits Lead to Time-Saving Advantages
Think of pre-cut and well-marked SIP panels as a giant jigsaw puzzle. They’re designed for precision, ensuring a foolproof assembly process. However, real-world conditions often present imperfections, especially with slabs and foundations that may not be perfectly even. For this reason, we shifted to using non-precut panels for most projects. Here’s why:
- On-Site Customization: Erect the walls first and cut out openings for windows and doors once the structure is in place. This approach compensates for any irregularities in the foundation.
- Unmatched Speed: With two trained workers, you can erect exterial walls for a 1,500 sq. ft. home in a single day or less.
- Structural Simplicity: SIPs eliminate the need for traditional load-bearing walls because each panel inherently bears the structure’s load.
Sill & Top Plates: Simple, Reliable Framework
We use galvanized steel U-tracks (20-gauge) for sill and top plates. Here’s how it works:
- Sill Plate Installation: Place the sill plate on a thin layer of foam insulation and secure it to the foundation. The panels are then positioned onto the sill and fastened with screws through the panel’s surface layers into the U-track.
- Top Plate Installation: Similarly, fasten the top plate onto the panels. Adjust the spacing of fasteners based on local wind conditions and seismic requirements.
- Panel Fasteners: Panels are connected to one another using the same straightforward fastening method.
Sealing and Insulation: No Gaps Left Behind
Seal the joints with weatherproof tape or reinforced polymers like epoxy. As you erect each panel, fill the joints with expandable foam insulation. This creates a seamless, airtight structure that maximizes energy efficiency.
Roof Trusses: A Perfect Fit for SIP Structures
To install roof trusses, follow these simple steps:
- Attach L-brackets to the top plate of the panels.
- Secure the trusses, ensuring they rest directly on the panel.
- Fasten the trusses to the L-brackets for a strong, reliable connection.
The result is a structure that can handle any load required for a single-story unit, offering unmatched durability and efficiency.
Conclusion
The transition to SIPs isn’t just about adopting new technology; it’s about revolutionizing how we think about building. With minimal training, builders can achieve remarkable efficiency, reducing both time and labor while enhancing structural integrity. If you’re in the construction field, consider the leap to SIP building—it might just redefine your career.


